Working on a custom task
Now that you've launched a task or two, it's time to get into building your own. This tutorial focuses on giving you the tools to collect the specific data you're looking for by building a task of your own. This tutorial itself won't produce a useful task, but it should be useful for understanding how to go about creating a real one. You don't need any React experience to get through this guide, though it will be helpful for understanding the usage more deeply.
1. Getting started
1.1 Making a new workspace
We'll extend from the static react task example, but we'll want to move it to it's own workspace. From within the main Mephisto directory:
cp -r examples/static_react_task/ tmp/static_tutorial/
cd tmp/static_tutorial/
Now that we're here, we should also set up your config file
# hydra_configs/conf/example.yaml
#@package _global_
defaults:
  - /mephisto/blueprint: static_react_task
  - /mephisto/architect: local
  - /mephisto/provider: inhouse
mephisto:
  blueprint:
    task_source: ${task_dir}/webapp/build/bundle.js
    link_task_source: false
    extra_source_dir: ${task_dir}/webapp/src/static
    units_per_assignment: 1
  task:
    task_name: custom-react-tutorial   # Remember to set an appropriate task_name!
    task_title: "Rating a sentence as good or bad"
    task_description: "In this task, you'll be given a sentence. It is your job to rate it as either good or bad."
    task_reward: 0.05
    task_tags: "test,simple,button"
It is important to give a new task_name as we are creating a custom task. For local development only it also makes sense to set link_task_source to true. This allows changes to propagate to your localhost server when you reload the page (otherwise you would have to shutdown and restart the server to see changes).
The task_source and extra_source_dir arguments are also of importance, as this is where the StaticReactBlueprint class will be looking for the compiled React app's Javascript bundle as well as a folder for extra static resources for the page, respectively.
1.2 Launching the task
From the current directory, you should be able to execute the run script and get a job working. We're using a different task_name to prevent polluting our later task with data that won't share the same format. It is a good practice to do this with initial iterations, and to change the task_name any time you change input or output arguments.
You can update the task_name and link_task_source values in your config and run the task like below
python run_task__local__inhouse.py
or you can set them when you run the task:
python run_task__local__inhouse.py mephisto.task.task_name=custom-react-tutorial-iterating mephisto.blueprint.link_task_source=true
This will launch a simple task where an annotator is supposed to note a sentence as being good or bad. Clicking a button auto-submits the task. In the next sections we'll add other content.
To establish a link where your changes will be propagated to the localhost server(when you reload), create a separate terminal window and run
cd webapp && npm run dev:watch
Moving forward, we'll update this task so that workers are able to edit the text as well as rate the original sentence.
2. Providing new data to the task
2.1 The SharedTaskState object and static_task_data attribute
We'll begin by modifying the SharedStaticTaskState's static_task_data attribute. For info on this attribute, recall mephisto wut:
$ mephisto wut blueprint=static_react_task static_task_data


                Tasks launched from static blueprints need
                a prebuilt javascript bundle containing the task. We suggest building
                with our provided useMephistoTask hook.


Additional SharedTaskState args from SharedStaticTaskState, which may be configured in your run script

                              Additional Shared TaskState args
╭──────────────────┬────────────────┬─────────┬────────────────────────┬─────────┬──────────╮
│ dest             │ type           │ default │ help                   │ choices │ required │
├──────────────────┼────────────────┼─────────┼────────────────────────┼─────────┼──────────┤
│ static_task_data │ Iterable[Dict] │ []      │ List or generator that │ None    │ False    │
│                  │                │         │ returns dicts of task  │         │          │
│                  │                │         │ data. Generators can   │         │          │
│                  │                │         │ be used for tasks with │         │          │
│                  │                │         │ lengths that aren't    │         │          │
│                  │                │         │ known at the start of  │         │          │
│                  │                │         │ a run, or are          │         │          │
│                  │                │         │ otherwise determined   │         │          │
│                  │                │         │ during the run.        │         │          │
╰──────────────────┴────────────────┴─────────┴────────────────────────┴─────────┴──────────╯
This field replaces using the csv_file used in the previous tutorial, allowing our run script to specify data directly. React tasks can be run off of .csv files as well, if you'd prefer.
At the moment, the data we're providing is as follows:
shared_state = SharedStaticTaskState(
    static_task_data=[
        {"text": "This text is good text!"},
        {"text": "This text is bad text!"},
    ],
    ...
)
This corresponds to two Assignments, each with an entry for text. Altering these will change the text that is present, while adding new entries to the array will lead to Mephisto generating more Assignments.
2.2 Editing static_task_data
For now let's just edit the data and add a new field. Update the static_task_data to look like this:
static_task_data=[
    {"text": "This text is good text! Now it is extra good", "edited_by_requester": True},
    {"text": "This text is bad text!", "edited_by_requester": False},
],
At this point you can run the task again.
python run_task__local__inhouse.py mephisto.task.task_name=custom-react-tutorial-iterating
Note the first one you work on displays your new edited text. But what about the new edited_by_requester field?
Tip: In your own tasks, you can use a function that creates static task data, or even a generator for it, but this is discussed more in the workflows tutorial.
3. Accessing the new data
3.1 Using React Dev Tools
Generally, developing with React is easiest if you have the React Dev Tools extension in your browser. It's currently available in Chrome and Firefox. With this you can peer into the react state and see what's inside:
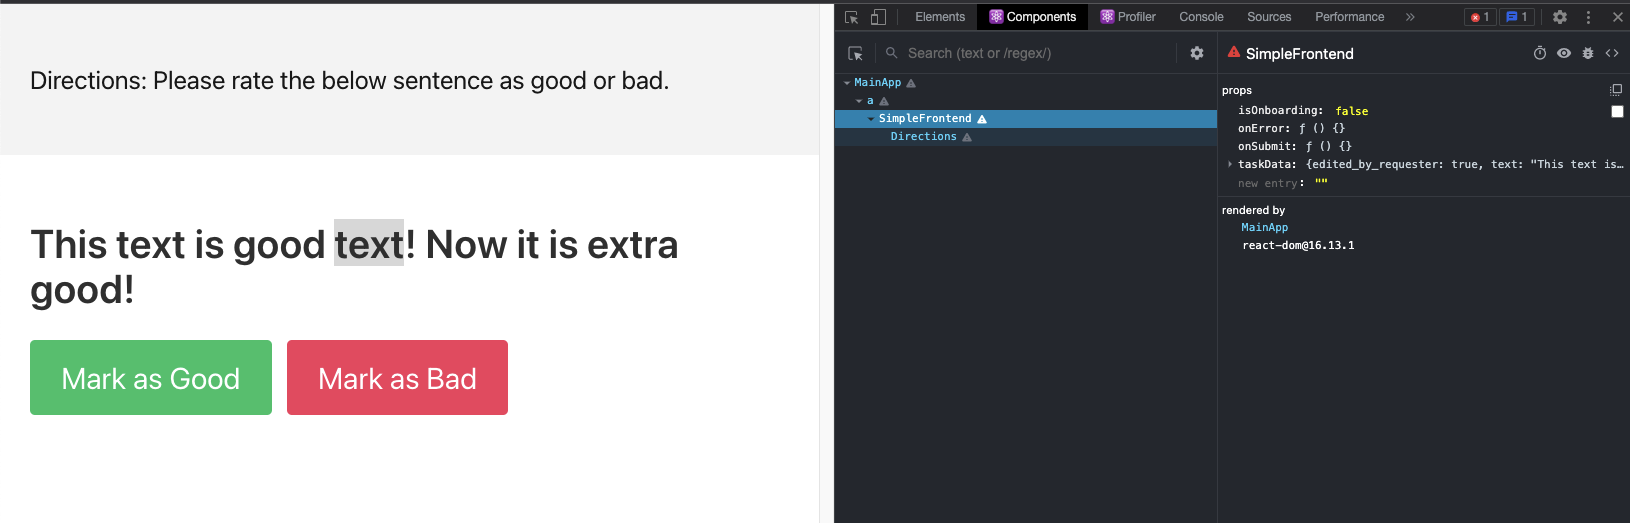 Here on the right you can see the
 text and edited_by_requester fields accessible in taskData. Now that we know it's there, we can do something with it.
3.2 A prop-flow exercise for React newcomers
The source code for your frontend exists in the webapp/src directory. For those who are new to React let's take a stop at MainApp in webapp/src/app.jsx to follow the path of the props through the application:
// webapp/src/app.jsx
function MainApp() {
  const {
    blockedReason,
    blockedExplanation,
    isPreview,
    isLoading,
    initialTaskData, // Task data comes from this hook
    handleSubmit,
    handleFatalError,
    isOnboarding,
  } = useMephistoTask();
Any Mephisto frontend task relies on either the useMephistoTask or useMephistoLiveTask hooks to get underlying state about the worker and the task. For now it's only important to note that we pull initialTaskData from Mephisto, as well as a handleSubmit function. (More details on usage of these hooks is available here.)
  if (blockedReason !== null) {
    return ...
  }
  if (isLoading) {
    return <LoadingScreen />;
  }
  if (isPreview) {
    return ...
  }
Mephisto tasks can have a few states, loading, blocked, preview, onboarding, and main task. At the moment we'll leave discussion of these states to later tutorials.
  return (
    <div>
      <ErrorBoundary handleError={handleFatalError}>
        <BaseFrontend
          taskData={initialTaskData}  // We'll be using these two props
          onSubmit={handleSubmit}     // in the next sections.
          isOnboarding={isOnboarding}
          onError={handleFatalError}
        />
      </ErrorBoundary>
    </div>
  );
}

ReactDOM.render(<MainApp />, document.getElementById("app"));
In this last segment, we find that we can access the initialTaskData from Mephisto in the BaseFrontend's taskData prop, and will be able to call handleSubmit through onSubmit.
3.3 Making a component to render the new data
Lets add a component to the frontend that will inform the worker if the edited_by_requester flag has been set. For this we'll be editing the BaseFrontend in webapp/src/components/core_components.jsx. Let's create a TellTextIsEditedBlock component:
// webapp/src/components/core_components.jsx
function TellTextIsEdited({ taskData }) {
    if (taskData.edited_by_requester) {
        return <p><b>
            Note: this text was pre-screened by the requester
        </b></p>;
    } else {
        return null;
    }
}
And now we can drop this into the SimpleFrontend component:
// webapp/src/components/core_components.jsx
function SimpleFrontend({ taskData, isOnboarding, onSubmit, onError }) {
  if (!taskData) {
    return <LoadingScreen />;
  }
  if (isOnboarding) {
    return <OnboardingComponent onSubmit={onSubmit} />;
  }
  return (
    <div>
      <Directions>
        Directions: Please rate the below sentence as good or bad.
        <TellTextIsEdited taskData={taskData} />
      </Directions>
      ...
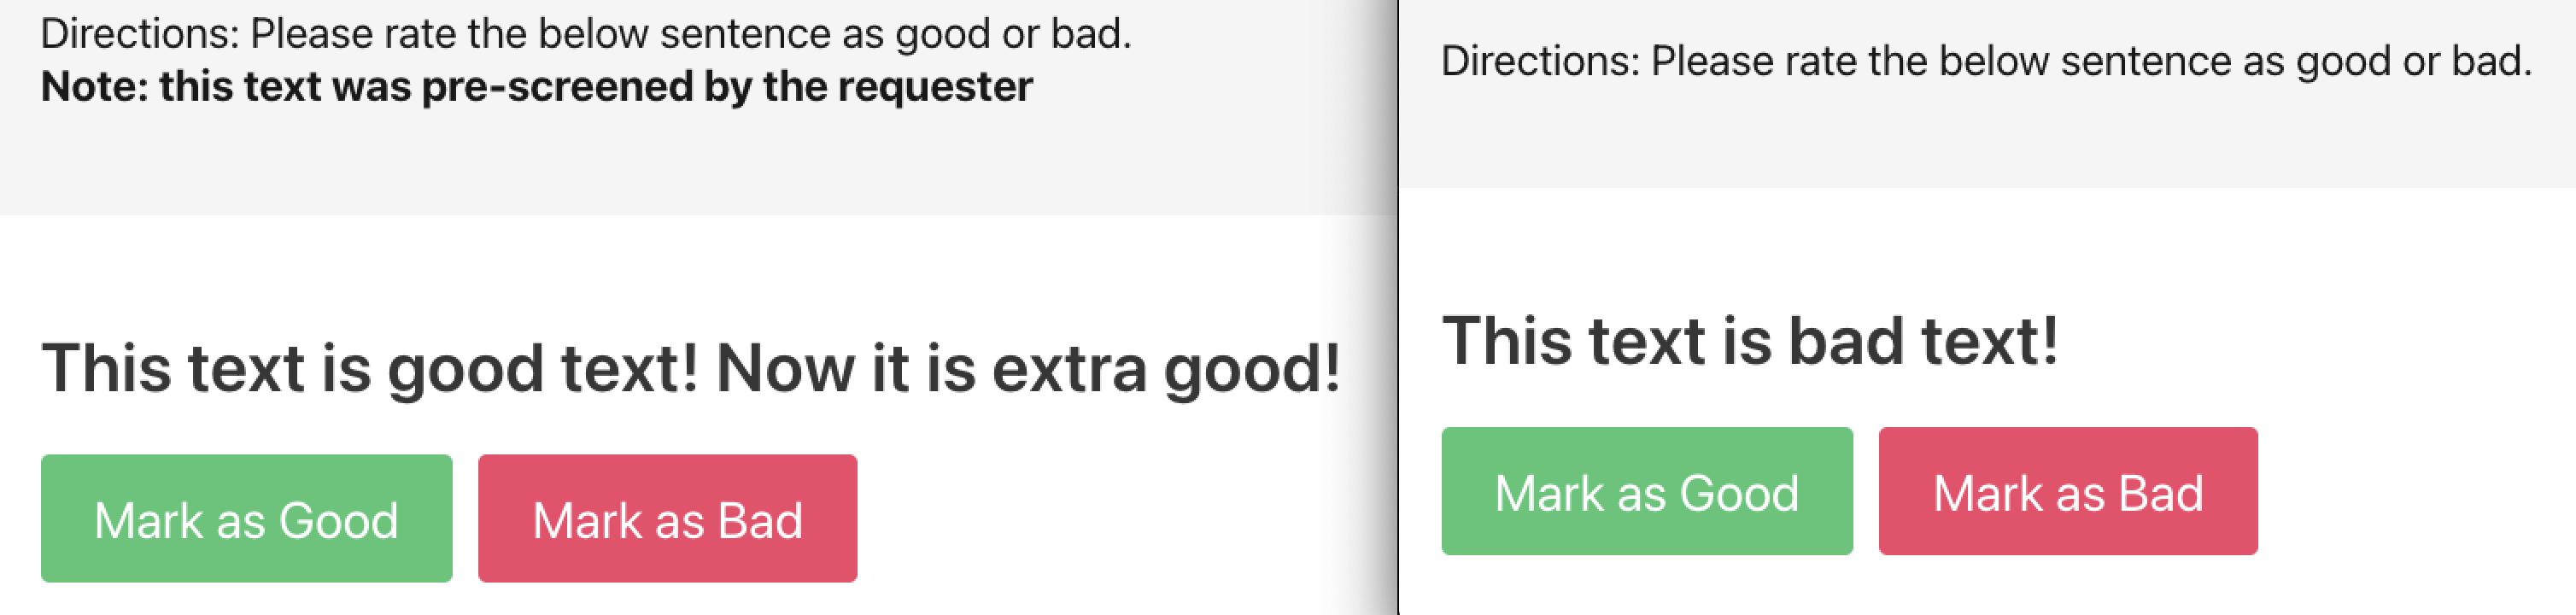
Launching again we find that the first task has our new text, but the second task doesn't. Success!
3.4 Adding a component to respond with new data
Now that we've used the full flow of providing custom task data to the worker and having components use these, the next step is to allow submission of whatever data you would like. At the moment, all that is sent to the backend is the rating, as can be seen in the two onSubmit calls:
onClick={() => onSubmit({ rating: "good" })}
...
onClick={() => onSubmit({ rating: "bad" })}
Based on how onSubmit is wired to Mephisto's handleSubmit function, anything (json-serializable) in the object passed to onSubmit will be what is saved for the task. For this tutorial we'll want to put something else useful into this object. To this end, let's add an input box that allows workers to submit an edit to correct the sentence in some way.
We can add some state to SimpleFrontend with the useState React Hook. This provides us with an editedText value initialized to taskData.text, which we'll set to track the worker edits, and a setter to alter that value.
// webapp/src/components/core_components.jsx
function SimpleFrontend({ taskData, isOnboarding, onSubmit, onError }) {
  const [editedText, setEditedText] = React.useState(taskData.text); // <=
  return (
      ...
We now need to create a text input field that is wired to this state:
...
<p className="title is-3 is-spaced">{taskData.text}</p>
<div>
    <b>Corrections:</b>
    <input
        type="text"
        value={editedText}
        onChange={(e) => setEditedText(e.target.value)}
        size="50"
    />
</div>
<div className="field is-grouped">
...
And lastly, make sure to add the new text to the submission packet in both onSubmit calls:
onClick={() => onSubmit({ rating: "good", editedText: editedText })}
...
onClick={() => onSubmit({ rating: "bad", editedText: editedText })}
Let's launch one last time.
python run_task__local__inhouse.py mephisto.task.task_name=custom-react-tutorial-iterating
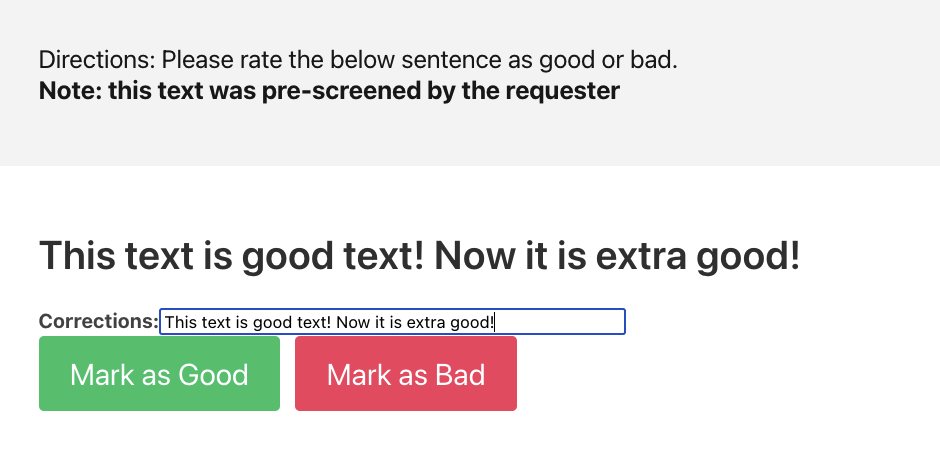
And just like that we're able to see an input field:
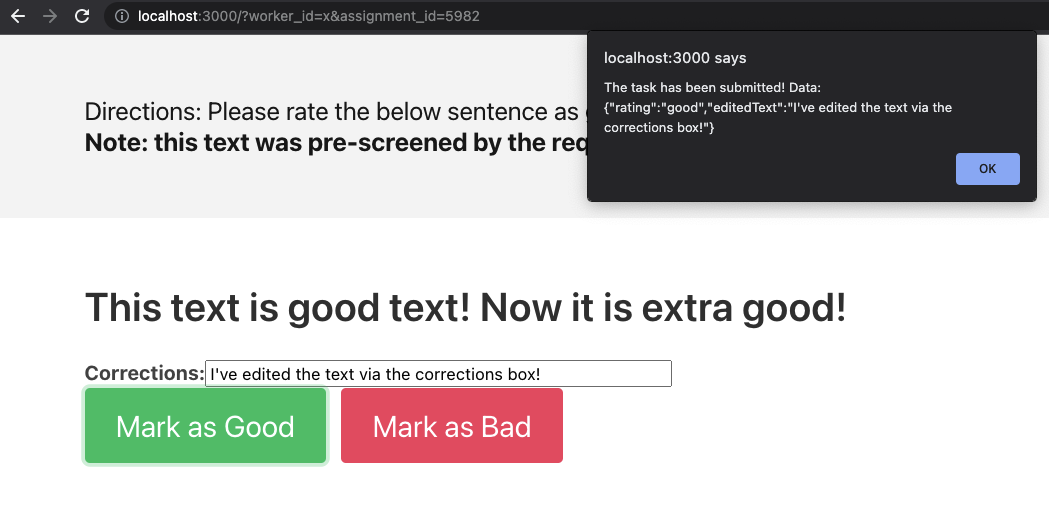
 When we hit submit, we can see our custom data is passed along as well:
 Congrats! You've been able to collect some custom data through Mephisto. Of course, this is just scratching the surface on the types of tasks you can create.
4. Setting up a review
4.1 Examining the raw data
Now that we've finished creating the task, we'll want to be able to review the data inside. Let's start by creating an examine_results.py script:
# examine_results.py
from mephisto.abstractions.databases.local_database import LocalMephistoDB
from mephisto.tools.examine_utils import run_examine_or_review, print_results
from mephisto.data_model.worker import Worker
from mephisto.data_model.unit import Unit

db = None

def format_data_for_printing(data):
    global db
    # Custom tasks can define methods for how to display their data in a relevant way
    worker_name = Worker.get(db, data["worker_id"]).worker_name
    contents = data["data"]
    duration = contents["times"]["task_end"] - contents["times"]["task_start"]
    metadata_string = (
        f"Worker: {worker_name}\nUnit: {data['unit_id']}\n"
        f"Duration: {int(duration)}\nStatus: {data['status']}\n"
    )

    inputs = contents["inputs"]
    inputs_string = f"Provided input: {inputs}\n"
    outputs = contents["outputs"]['final_data']
    output_string = f"Provided output: {outputs}\n"
    return f"-------------------\n{metadata_string}{inputs_string}{output_string}"


def main():
    global db
    db = LocalMephistoDB()
    run_examine_or_review(db, format_data_for_printing)


if __name__ == "__main__":
    main()
This review script is very much like the one we used in the first tutorial, however we've left things particularly generic for now. You'll recall that all of the tasks we'd launched so far used the same task_name: custom-react-tutorial-iterating. Let's see what happens when we check it out:
>> python examine_results.py
Do you want to (r)eview, or (e)xamine data? Default examine. Can put e <end> or e <start> <end> to choose how many to view
e
Input task name: custom-react-tutorial-iterating
-------------------
Worker: x
Unit: 5984
Duration: 10
Status: completed
Provided input: {'text': 'This text is good text! Now it is extra good!', 'edited_by_requester': True}
Provided output: {'rating': 'good', 'editedText': "I've edited the text via the corrections box!"}

-------------------
Worker: x
Unit: 5982
Duration: 10
Status: completed
Provided input: {'text': 'This text is good text! Now it is extra good!', 'edited_by_requester': True}
Provided output: {'rating': 'good'}

-------------------
Worker: x
Unit: 5975
Duration: 11
Status: completed
Provided input: {'text': 'This text is bad text!', 'edited_by_requester': False}
Provided output: {'rating': 'bad'}
You may have a different number of submissions depending on how many you did in the tutorial, but importantly you'll find that not all of them have a provided output entry for editedText. This is because we changed the format mid-way while continuing to use the same task_name.
Generally, you should change the task_name between runs such that your data format is consistent throughout, but you can also ensure that your format_for_printing_data function is tolerant of the changes.
In any case, for future runs you could have formatting that explicitly extracts the portions you're interested in, or does additional logic to make your review easier. For instance, you could make it so that the corrected text is only shown if the worker made an edit:
...
outputs = contents["outputs"]['final_data']
did_edit_text = outputs['editedText'] == inputs['text']
edit_text_string = f"Corrected Text: {outputs['editedText']}\n" if did_edit_text else ""
output_string = f"Provided rating: {outputs['rating']}\n{edit_text_string}"
...
While creating review scripts is powerful, it's not always the easiest way to review data. Annotations that are best in full context, like videos for instance, would likely benefit from being able to view the data directly.
4.2 Using a web-based review flow
For tasks that are best reviewed through a full UI, Mephisto offers a way to create web-based review flows.
To view the results of the task we just ran through the web-based workflow, run the mephisto review CLI tool:
mephisto review --db custom-react-tutorial-iterating --stdout --all
This will launch a local server where you will be able to browse, filter, and drill into the data collected for your task.

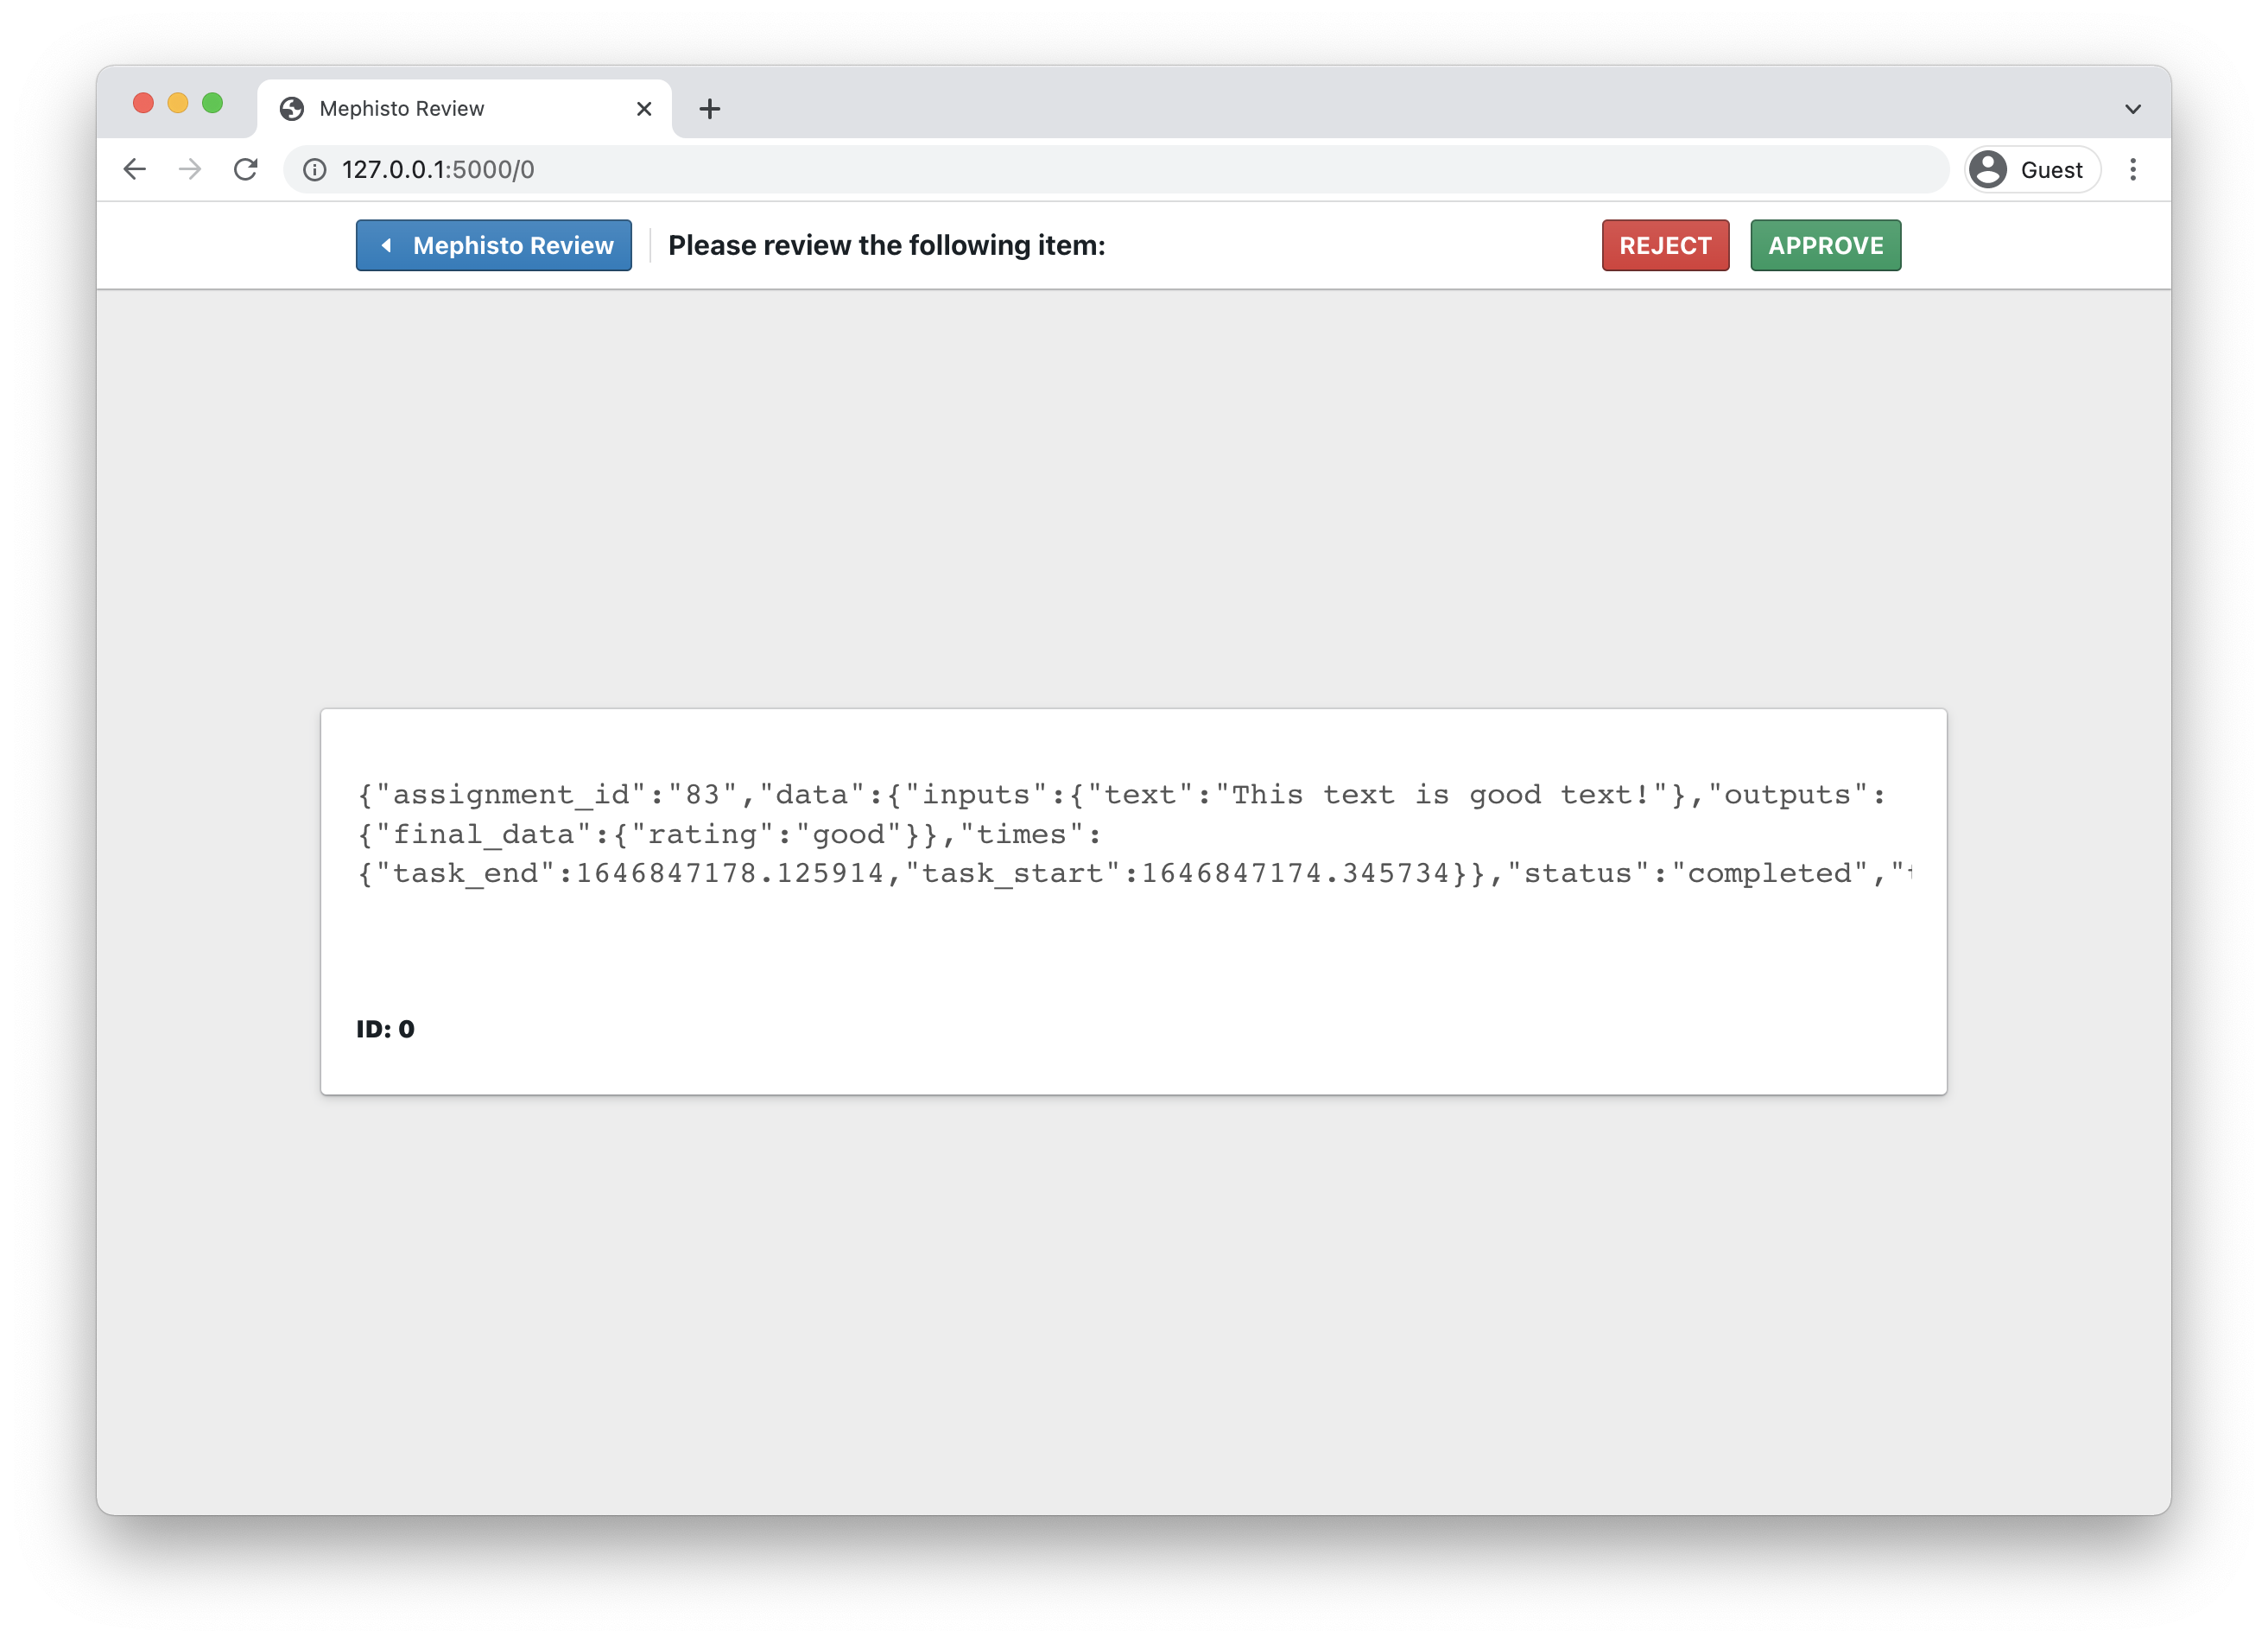
You can also drill into a specific task to explore the details further.
4.3 Customizing the web-based review flow
By default, we ship with a batteries-included review experience, however you can easily create your own interface with custom "renderers" for visualizing your collected data.
Let's walk through creating our own custom renderer for our data.
First, we'll create our review application by using the create-react-app npm package, with a mephisto review template. Continuing from within our project folder at tmp/static_tutorial/ let's run:
npx create-react-app@latest custom-review --template mephisto-review
Once the template is done installing we'll create a new file at custom-review/src/custom/MyDataItem.js and fill it in as such:
import React from "react";
import { Card } from "@blueprintjs/core";

export default function MyDataItem({item}) {
    const rating = item.data.data.outputs.final_data.rating;
    const duration = Math.round(item.data.data.times.task_end - item.data.data.times.task_start);
    return <Card>
        <h1>{ rating === "good" ? "👍" : "👎"}</h1>
        <p>{duration} seconds</p>
    </Card>
}
Note that we're leveraging the <Card /> component from the rich suite of components provided by BlueprintJS to create our renderer. By default, the review template imports the @blueprintjs/core library so you can immediately start using any of the UI components provided there.
Now that we've created our own ItemRenderer, we'll use it by updating custom-review/src/index.js to first import the renderer:
import MyDataItem from "./custom/MyDataItem"
Then we'll pass it to the <CollectionView /> component to modify the way in which our data renders in the grid view:
<CollectionView
  collectionRenderer={GridCollection}
  itemRenderer={MyDataItem}
  pagination={true}
  resultsPerPage={9}
/>
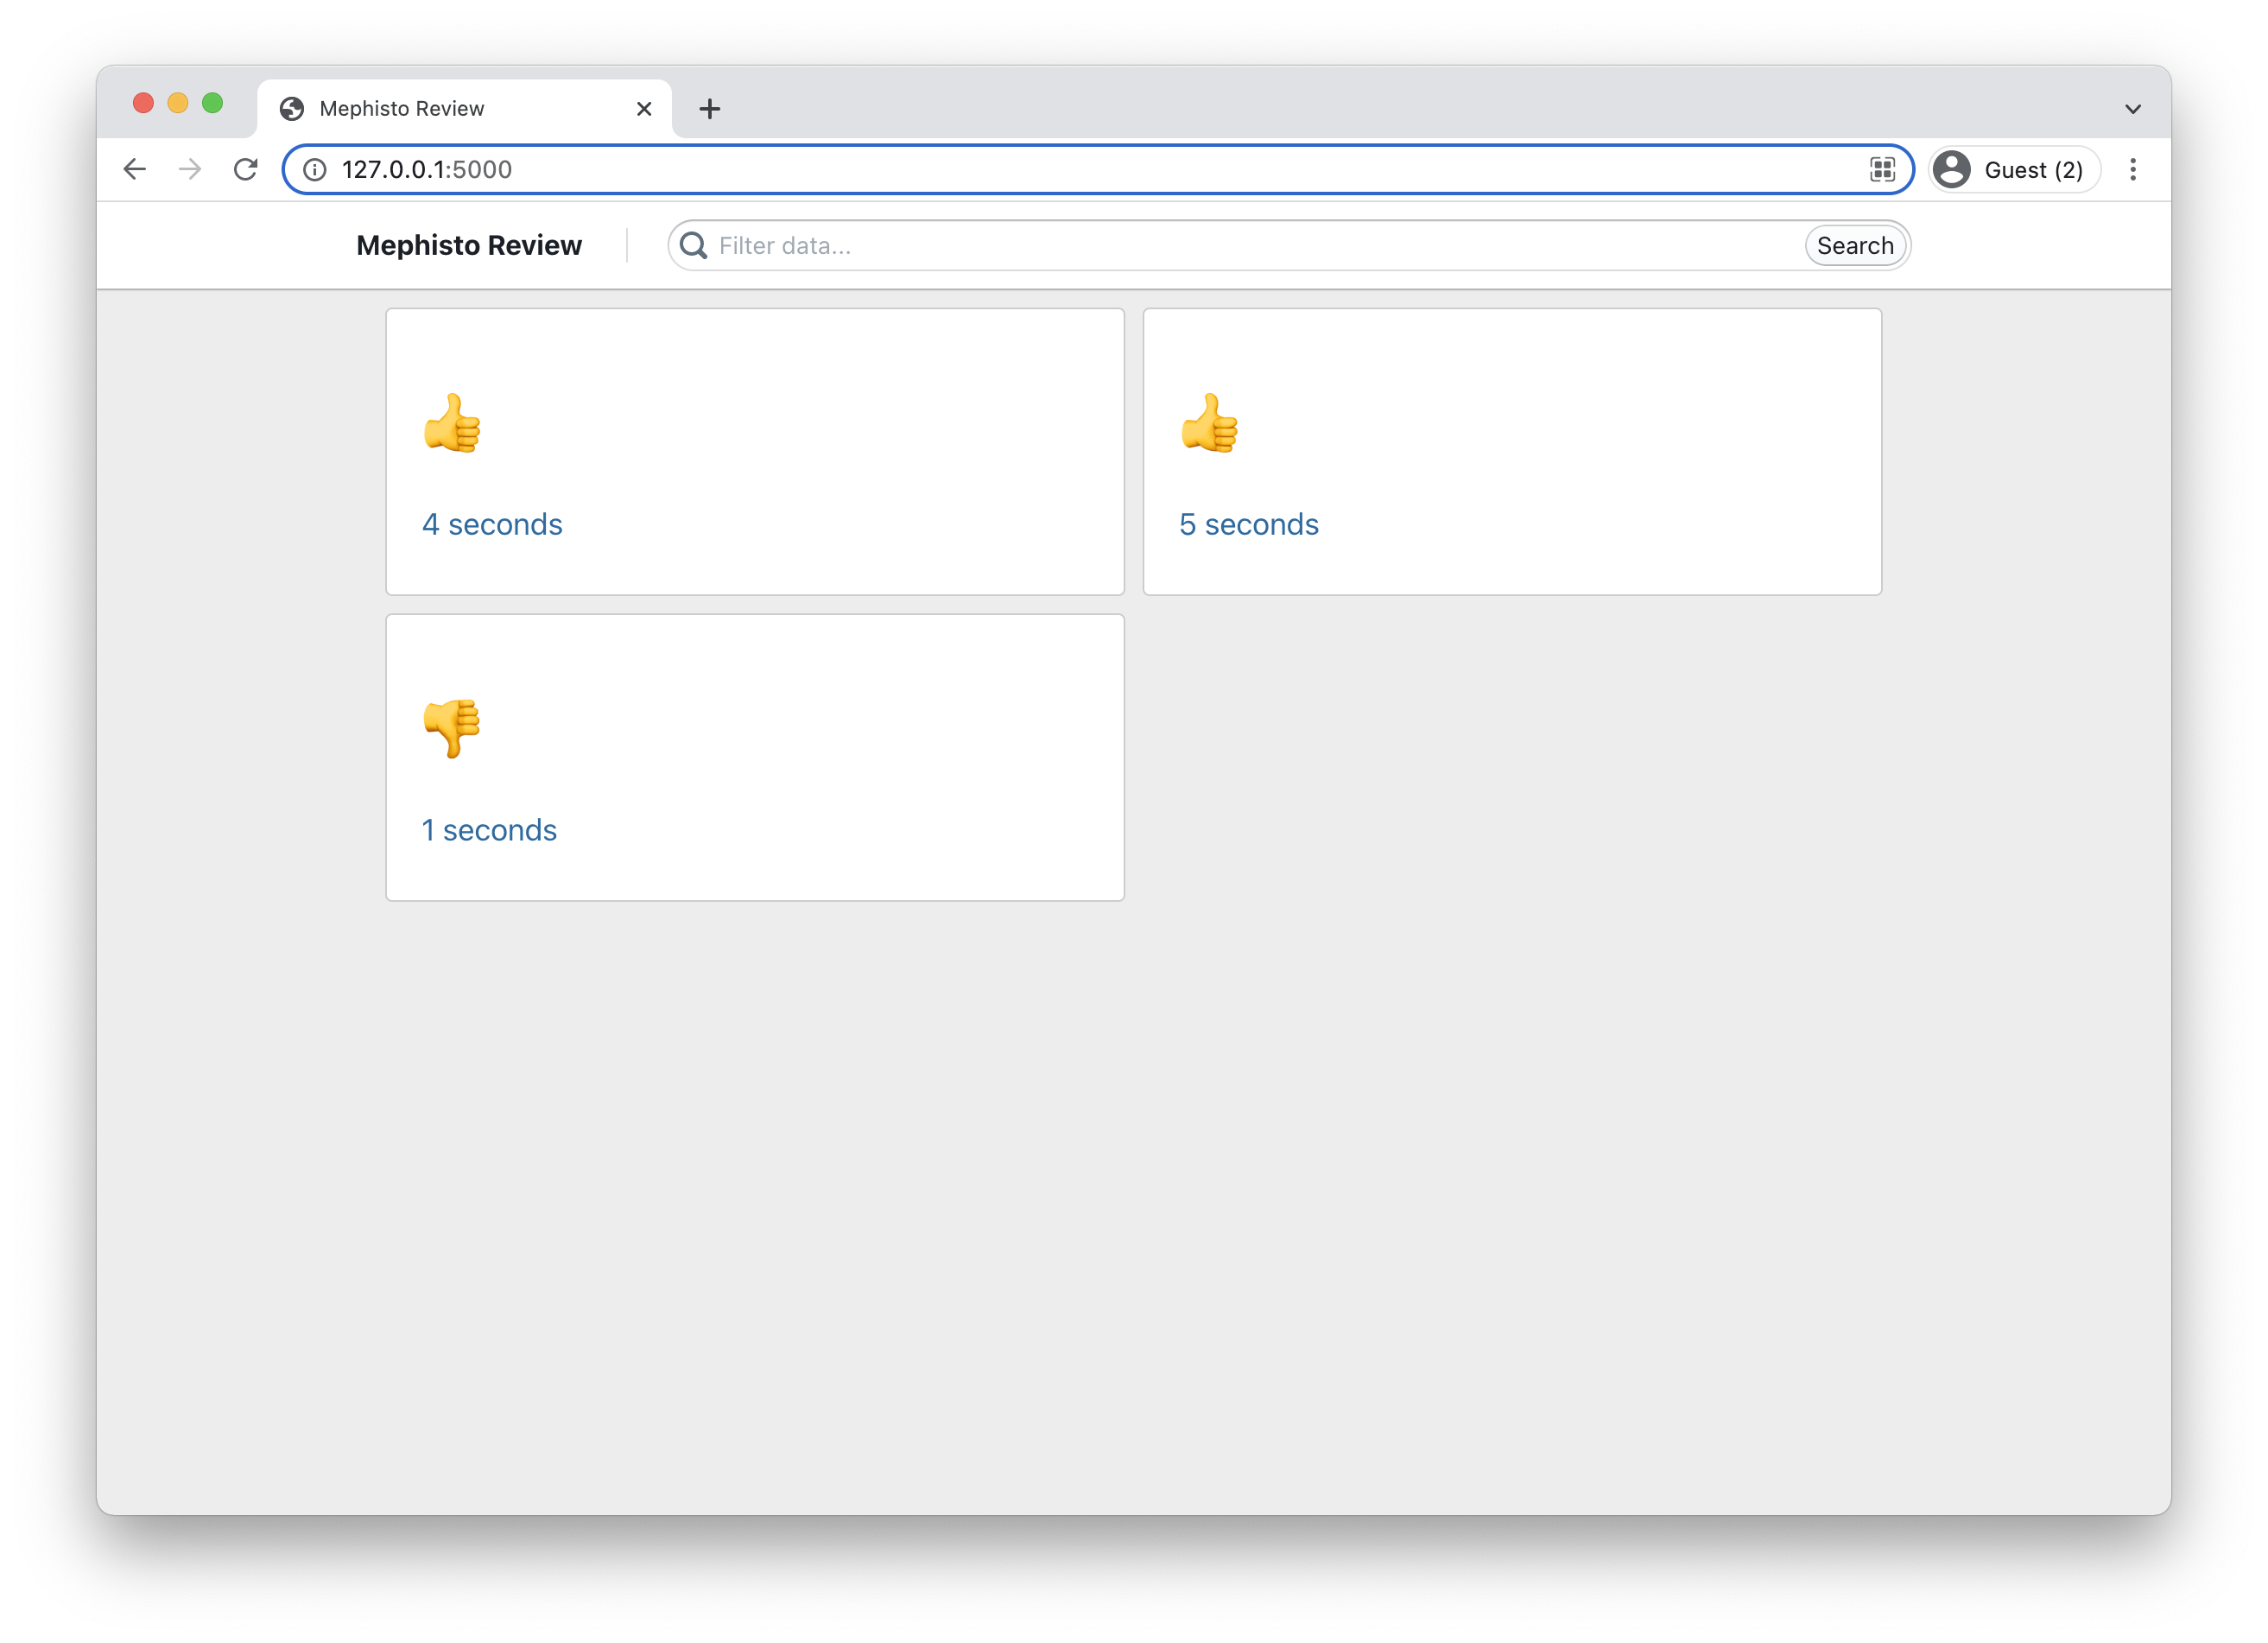
To see our new renderer in action, let's build our app and invoke the mephisto review CLI with it.
cd custom-review/
npm run build
mephisto review build/ --db custom-react-tutorial-iterating --stdout --all
Note: Notice that the mephisto review command here is similar to the one run in the previous section, except this time we pass in the relative path to the build folder as an argument.
Building from task blocks with @annotated [BETA]
Mephisto at the core is built for complete flexibility over the kinds of tasks you can create. Building everything from scratch though can be a lot, so we've created the annotation toolkit and @annotated suite of libraries. These have components that may be useful for your annotation tasks, as well as examples of developed flows you can use or extend for your tasks.
The full suite of tools is currently in beta and can be found in the Storybook here.